ご注意下さい
この記事は3年以上前に書かれた記事ですので、内容が古い可能性があります。
SSLをハンドリングする場合については、apacheでのリバースプロキシ構築(SSL編)に追記しました。
-

-
apacheでのリバースプロキシ構築(SSL編)
前回のapacheでのリバースプロキシ構築の続編です。 今度はバックエンド側でHTTPSのホームページがある場合になります。 この場合クライア …続きを見る
ウェブサーバの移行用のリバースプロキシーサーバを構築する
うちの自宅は1つのグローバルIPで複数のドメインを運用し、複数のHPやらBlogを運営しています。
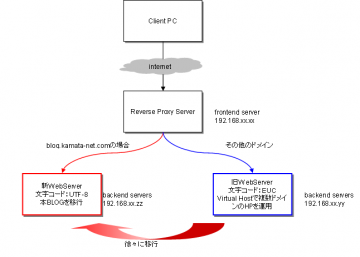
今回自分のBlogはMovable TypeからWordPressに移行しましたが、サーバのOSが古かったせいもありWordPressは新サーバを構築して移行をしています。しかし一回で全てのコンテンツを移行するのはなかなか難しかったため、リバースプロキシサーバを立ててURIで新旧のサーバを振り分けるようにしたいと思います。
イメージは以下の通り。
今回のポイントは以下の点かと思います。
ポイント
- バーチャルドメインを使って運用している
- バックエンドサーバの文字コードが違う
さて、それでは各サーバの設定を見ていきます。
フロントエンドサーバ
フロントエンドサーバ側にはReverseProxyの設定をします。
LoadModule proxy_module modules/mod_proxy.so
~~
#
# Specify a default charset for all content served; this enables
# interpretation of all content as UTF-8 by default.  To use the
# default browser choice (ISO-8859-1), or to allow the META tags
# in HTML content to override this choice, comment out this
# directive:
#
#AddDefaultCharset UTF-8
AddDefaultCharset Off

#
# AddType allows you to add to or override the MIME configuration
# file mime.types for specific file types.
#
#AddType application/x-tar .tgz
11行目のキャラクタセットをOffに変更します。これをオフにしていないとバックエンドサーバの旧サーバ側の文字が化け化けになってしまいます。
以下Virtualhostごとにリバースプロキシ設定を入れます。
#NameVirtualHost *:80
#
# NOTE: NameVirtualHost cannot be used without a port specifier
# (e.g. :80) if mod_ssl is being used, due to the nature of the
# SSL protocol.
#
NameVirtualHost 192.168.xx.xx:80

#
# VirtualHost example:
# Almost any Apache directive may go into a VirtualHost container.
# The first VirtualHost section is used for requests without a known
# server name.
#
#<VirtualHost *:80>
#    ServerAdmin webmaster@dummy-host.example.com
#    DocumentRoot /www/docs/dummy-host.example.com
#    ServerName dummy-host.example.com
#    ErrorLog logs/dummy-host.example.com-error_log
#    CustomLog logs/dummy-host.example.com-access_log common
#</VirtualHost>
<VirtualHost 192.168.xx.xx:80>
ProxyPreserveHost On
ProxyPass /
ProxyPassReverse /
ServerName hogehoge.com
ServerAlias *.hogehoge.com
ErrorLog logs/error_log
TransferLog logs/access_log
</VirtualHost>

<VirtualHost 192.168.xx.xx:80>
ProxyPreserveHost On
ProxyPass /
ProxyPassReverse /
ServerName example.com
ServerAlias *.example.com
ErrorLog logs/error_log
TransferLog logs/access_log
</VirtualHost>

<VirtualHost 192.168.xx.xx:80>
ProxyPreserveHost On
ProxyPass /
ProxyPassReverse /
ServerName kamata-net.com
ServerAlias *.kamata-net.com
ErrorLog logs/error_log
TransferLog logs/access_log
</VirtualHost>
バックエンドサーバ
バックエンド側サーバの設定変更は特に必要ありません。
記事は以上!

