
ご注意下さい
この記事は3年以上前に書かれた記事ですので、内容が古い可能性があります。
nginxを触ってみたい、というのもありnginxでロードバランサーかつSSLアクセラレータ(SSLオフロード)を今回試してみました。バックエンドにはWordPressが載っているApacheがあるのですが、今回はWordPress側を非SSLに戻す必要もありましたので若干はまっています。
さて、では手順を見ていきましょう。
この記事のもくじ
nginx
nginx側はそんなに難しくありませんでした。
まずは/etc/nginx/nginx.conf
# For more information on configuration, see:
#   * Official English Documentation: http://nginx.org/en/docs/
#   * Official Russian Documentation: http://nginx.org/ru/docs/

user nginx;
worker_processes auto;
worker_rlimit_nofile 100000;
error_log /var/log/nginx/error.log;
pid /run/nginx.pid;

# Load dynamic modules. See /usr/share/doc/nginx/README.dynamic.
include /usr/share/nginx/modules/*.conf;

events {
    worker_connections 2048;
    multi_accept on;
    use epoll;
}

http {
    log_format  main  '$remote_addr - $remote_user [$time_local] "$request" '
                      '$status $body_bytes_sent "$http_referer" '
                      '"$http_user_agent" "$http_x_forwarded_for"';

    access_log  /var/log/nginx/access.log  main;

    sendfile            on;
    tcp_nopush          on;
    tcp_nodelay         on;
    #keepalive_timeout   65;
    keepalive_timeout   10;
    types_hash_max_size 2048;

    include             /etc/nginx/mime.types;
    default_type        application/octet-stream;

    # Load modular configuration files from the /etc/nginx/conf.d directory.
    # See http://nginx.org/en/docs/ngx_core_module.html#include
    # for more information.
    include /etc/nginx/conf.d/*.conf;
いくつかパラメータをデフォルトの設定から変更しています。
新たに今回の構築の目的用に/etc/nginx/conf.d/ssl_lb.confを作成しました。
upstream backend {
        server 192.168.30.101:80;
        server 192.168.30.104:80 down;
}

proxy_next_upstream error timeout;
proxy_set_header Host $host;
proxy_set_header X-Real-IP $remote_addr;
proxy_set_header X-Forwarded-For $remote_addr;
proxy_set_header X-Forwarded-Proto https;
proxy_set_header X-Forwarded-Port 443;
port_in_redirect off;
add_header Front-End-Https on;

server_tokens off;
client_header_timeout 10;
client_body_timeout 10;
reset_timedout_connection on;
gzip on;
gzip_http_version 1.0;
gzip_disable "msie6";
gzip_proxied any;
gzip_min_length 1024;
gzip_comp_level 6;
gzip_types text/plain text/css application/x-javascript text/xml application/xml application/xml+rss text/javascript application/javascript application/json;
open_file_cache max=100000 inactive=20s;
open_file_cache_valid 30s;
open_file_cache_min_uses 2;
open_file_cache_errors on;

server {
        listen 80;
        listen [::]:80;
        server_name blog.kamata-net.com;
        return 301 https://$host$request_uri;
}
server {
        listen 443 ssl;
        listen [::]:443 ssl;
        server_name blog.kamata-net.com;
        access_log /var/log/nginx/blog.kamata-net.com-access.log;
        ssl on;
        ssl_certificate /etc/nginx/certs/blog.kamata-net.com.crt;
        ssl_certificate_key /etc/nginx/certs/blog.kamata-net.com.nokey;
        ssl_protocols TLSv1 TLSv1.1 TLSv1.2 TLSv1.3;
        ssl_ciphers RC4:HIGH:!aNULL:!MD5:!SEED:!IDEA;
        ssl_prefer_server_ciphers on;
        ssl_session_cache shared:SSL:10m;
        ssl_session_timeout 10m;

        location / {
                proxy_redirect off;
                proxy_headers_hash_max_size 512;
                proxy_headers_hash_bucket_size 128;
                proxy_pass http://backend;
        }
}
強いて補足をすると、ハイライトした31、39行目はIPv6でリッスンするための設定です。
サーバー証明書
apache httpdの場合は、サーバ証明書(crt)、中間証明書(ca)を別々に配置することができました。
#   Server Certificate:
# Point SSLCertificateFile at a PEM encoded certificate.  If
# the certificate is encrypted, then you will be prompted for a
# pass phrase.  Note that a kill -HUP will prompt again.  A new
# certificate can be generated using the genkey(1) command.
#SSLCertificateFile /etc/pki/tls/certs/localhost.crt
SSLCertificateFile /etc/ssl/certs/blog.kamata-net.com.crt

#   Server Private Key:
#   If the key is not combined with the certificate, use this
#   directive to point at the key file.  Keep in mind that if
#   you've both a RSA and a DSA private key you can configure
#   both in parallel (to also allow the use of DSA ciphers, etc.)
#SSLCertificateKeyFile /etc/pki/tls/private/localhost.key
SSLCertificateKeyFile /etc/ssl/certs/blog.kamata-net.com.key

#   Server Certificate Chain:
#   Point SSLCertificateChainFile at a file containing the
#   concatenation of PEM encoded CA certificates which form the
#   certificate chain for the server certificate. Alternatively
#   the referenced file can be the same as SSLCertificateFile
#   when the CA certificates are directly appended to the server
#   certificate for convinience.
#SSLCertificateChainFile /etc/pki/tls/certs/server-chain.crt
SSLCertificateChainFile /etc/ssl/certs/blog.kamata-net.com.ca
nginxの場合はサーバー証明書と中間証明書をまとめる必要があります。サーバー証明書の後ろに中間証明書をくっつけて(cat ca >>crt)1つのファイルにまとめます
# cat blog.kamata-net.com.ca >> blog.kamata-net.com.crt
かつ、私の場合、keyファイルにパスフレーズが付いており、/usr/libexec/httpd-ssl-pass-dialogで自動入力していたのですが、これもNGです。パスフレーズを除きましょう。
openssl rsa -in blog.kamata-net.com.key -out blog.kamata-net.com.nokey
Enter pass phrase for blog.kamata-net.com.key:
writing RSA key
念のため、サーバー証明書と秘密鍵が正当なペアであるかの確認もしておきます。MD5値が同じ値になれば正当なキーペアです。
openssl rsa -in blog.kamata-net.com.nokey -modulus -noout | openssl md5
(stdin)= 88f7167405adc566c421d065114a2758
openssl x509 -in blog.kamata-net.com.nokey -modulus -noout | openssl md5
(stdin)= 88f7167405adc566c421d065114a2758
WordPressの非SSL化
上段まではいろいろなサイトに書いてあり私が解説するまでもないのですが、今回はこちらを書きたかった…。nginxとWordPressでリダイレクトしあい「ERR_TOO_MANY_REDIRECTS」がなかなか解消しなかったからです。
Really Simple SSL プラグインは引き続き利用する
今回WordPress側は非SSL化するのですが、ややこしいのは記事内のリンク(他記事や画像へのリンク)やファイルパス(特にJS)へのリンクは引き続きhttps://~でないとMixed Contentエラーとなり、以下のような症状が現れます。
混在コンテンツによって引き起こされる不具合例
- 混在コンテンツ(Mixed Content)エラーとなり画像が表示されない
- 同様に、JSが実行されず画面レイアウトが崩れる
- ブラウザ上鍵マークは出るものの「このサイトへの接続は完全には保護されていません」となっている(Chromeの場合)
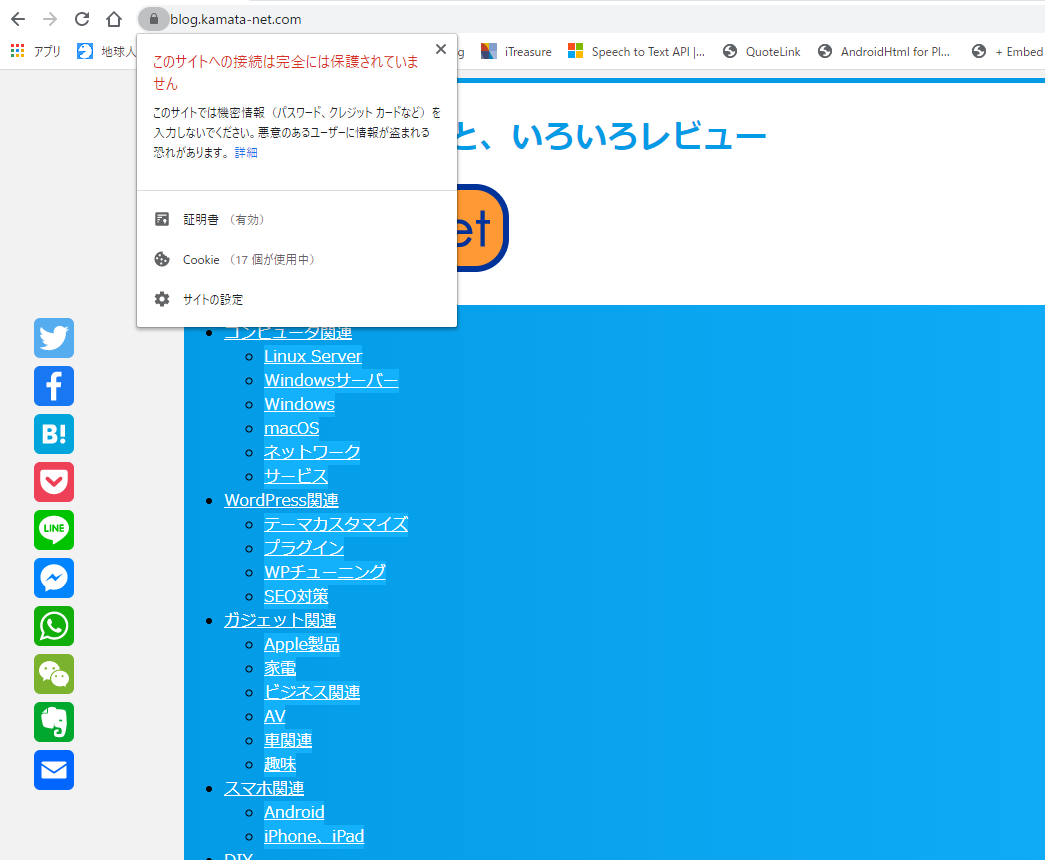
レイアウトが崩れているうえに、証明書エラーも
私はReally Simple SSLを永らく利用してサイトのSSL化を実施してきました。

このプラグインを「無効」にしたり「削除」してしまってはいけません。まだ利用します。ただしリダイレクトを無効にしないとリダイレクトのループに入ってしまいます。
なぜならばnginxでSSLがオフロードされてWordPressにはHTTP(80/tcp)しか入ってきませんが、Really Simple SSL がHTTPS(443/tcp)にリダイレクトしてしまうと、またnginxでHTTPに変換して…と繰り返してしまうからです。
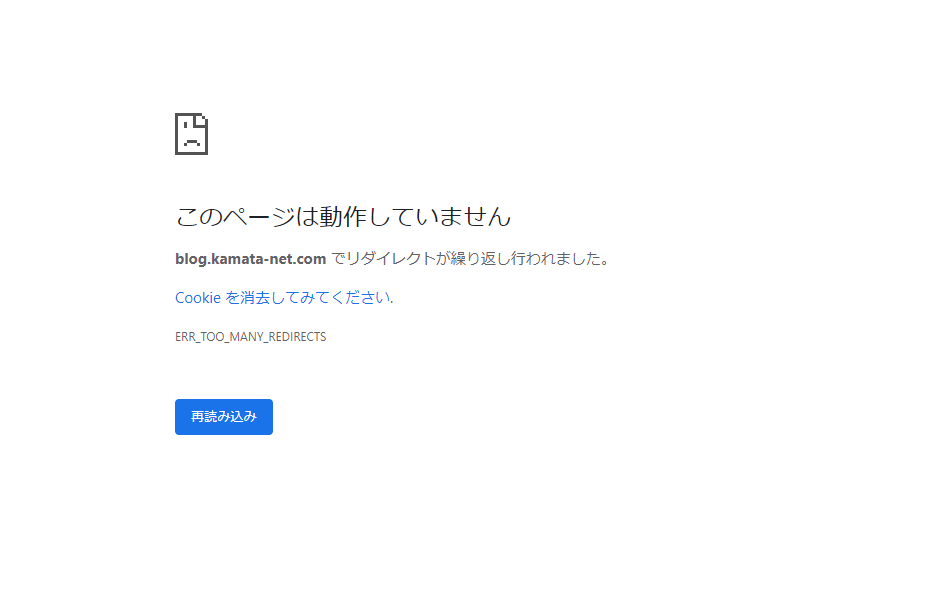
ChromeでのERR_TOO_MANY_REDIRECTSエラー画面
ですのでこのプラグインには混在コンテンツの修正(具体的にはリンクはパス中のhttp://~をhttps://~への書き換え)のみを行ってもらいます。
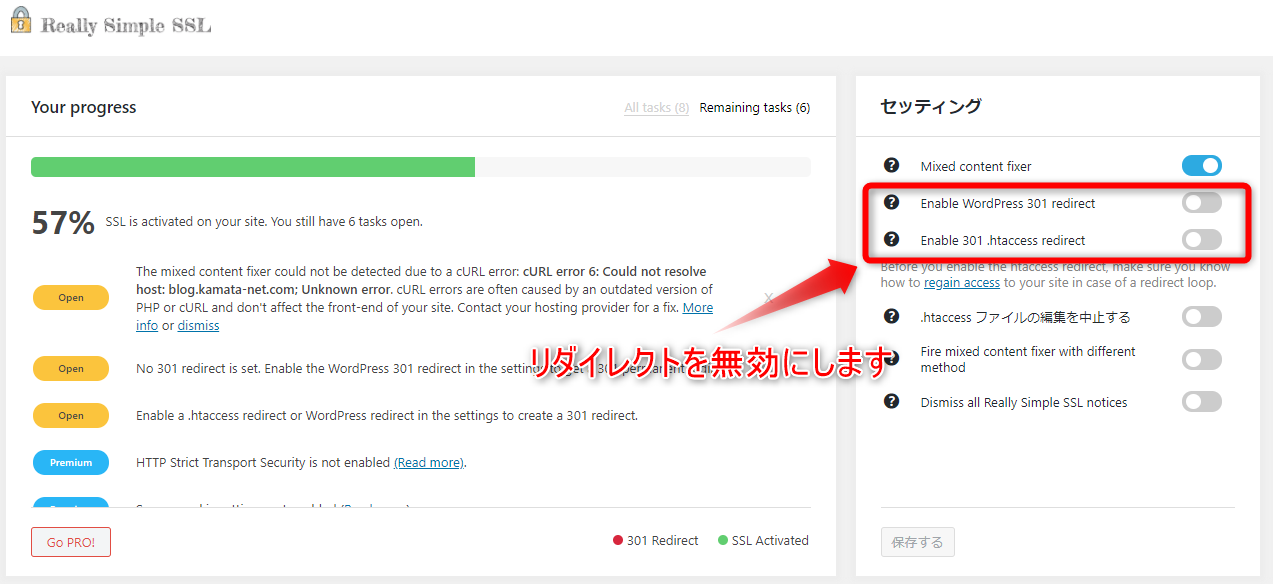
リダイレクトを無効にします
wp-config.phpの修正
私の場合、上記対応だけでもダメで、引き続き以下の症状が出ていました。
引き続き発生した不具合
- 混在コンテンツ(Mixed Content)エラーとなりJSが実行されず画面レイアウトが崩れる
- 管理画面に入れない(ERR_TOO_MANY_REDIRECTS)
しかし、下記の記事に救われました。本当にありがとうございました。
CDNまたはロードバランサーからのアクセスなのか、それともブラウザからのアクセスなのかをWEBサーバー側で検知し、CDNまたはロードバランサーからのアクセスだった場合は、HTTPSにリダイレクトしないという判定を行う必要があります。
https://blog.redbox.ne.jp/wordpress-ssl-cdn.html
具体的には、
X-Forwarded-Protoヘッダを正しくWordPressで認識できるように、以下の様にwp-config.phpを修正する必要があります。
if ( ! empty( $_SERVER['HTTP_X_FORWARDED_PROTO'] ) && $_SERVER['HTTP_X_FORWARDED_PROTO'] == 'https' ) { $_SERVER['HTTPS']='on'; }
https://blog.redbox.ne.jp/wordpress-ssl-cdn.html
と、いうこでしたので、wp-config.phpを修正します。
$wordpress/wp-config.php
/** Absolute path to the WordPress directory. */
if ( ! defined( 'ABSPATH' ) ) {
        define( 'ABSPATH', __DIR__ . '/' );
}

if (isset($_SERVER['HTTP_X_FORWARDED_PROTO']) && $_SERVER['HTTP_X_FORWARDED_PROTO'] == 'https') $_SERVER['HTTPS'] = 'on';

/** Sets up WordPress vars and included files. */
require_once ABSPATH . 'wp-settings.php';
require_onceの行の前に記述しないと有効になりません。
これで無事にWordPressの非SSL化が実現できました。
記事は以上!