ご注意下さい
この記事は3年以上前に書かれた記事ですので、内容が古い可能性があります。
パソコン好きや仕事などで必要に迫られてWindowsとMacの両方を混在して使用しているユーザーもいるかと思いますが、私もそのうちの一人です。今まではWindows(+Windows Server+Linux)環境で揃えていましたが、クライアント用としてはMacの方が使いやすいかもしれない、と思いmac miniの発売を機にMacユーザーになっちゃいました。今回新しくMacOSが我が家の環境に加わりましたので試行錯誤した内容をメモがてら共有します。なぜMacOSに興味を持ったかというと、WIndowsのiTunesがクソ重いから…、です。
この記事のもくじ
はじめに
私の家の環境(Mac+Windows)
まず私の環境をおさらいします。以前は手元にクライアントPCとしてWindows10 Proがあり、サーバとしてWindows Serverがありました。そしてそのWinServer上にHyper-V仮想マシンとしてLinux及びWindows10 Proがあります。手元のWin10はあくまでリモートデスクトップ接続アプリ起動用で、WinServer上のWin10にリモートデスクトップする為だけに使用していたようなものです。手元のPCはある意味シンクライアントとして使っていた、というイメージでしょうか。
iTunesの同期は手元のPCとして実施していましたが、これはまた別の機会にご紹介します。
今回手元のPCをWin10からMacに変えましたのでまずはWInServer上のWin10へのリモートデスクトップ接続をなんとかしたいと思います。
リモートデスクトップ編
リモートデスクトップアプリ
Mac用のリモートデスクトップアプリは以下の2つがあります。
私としては以下の理由からParallels Clientをオススメします。
Parallelsクライアントをお薦めする理由
リモートデスクトップ接続先のWindows側で
- 日本語キーボード(JIS配列)をそのまま日本語キーボードとして認識してくれる
- 日本語切り替え(IME)をMacと同じように「英数(IME Off)」、「かな(IME On)」で切り替えできる
からになります。特にJIS配列を認識してくれないのは致命的です。Microsoft Remote Desktop 10 の場合、JIS配列配列をリモートデスクトップ先に認識させるのに、初回はJIS配列のWindowsからアクセスする必要があるなど使い勝手があまりよくありません。
Karabiner-Elements
Ctrl-C、V、X
これは直接リモートデスクトップ接続には関係ありませんが、Macではコピー&ペーストはCtrl-C、Ctrl-Vではなく、Cmd-C、Cmd-Vになります。私は使い慣れたCtrl-C、Vを使いたいのでKarabiner-Elementsを使ってキーの入れ替えを行っています。
Karabiner-Elements
正確にはキーの入れ替えではなく、Ctrl-CにCmd-Cを割り当てています。ただし一律全てのアプリに対してこの設定を適用してしまうと、Parallelsクライアント画面内(リモートデスクトップ接続先のWindows側)でCtrl-CをしてもCmd-C(CmdキーはWindows側でWindowsキーとして認識される)を送ってしまうことになります。ですのでParallels Clientに対してはCtrl-CはCtrl-Cとして送る設定が必要となります。また、(余談ですが)Terminalに対してもCtrl-CはCtrl-Cとして送らないとコマンドの割り込みシグナルが送れませんので除外が必要です。
{
    "title": "Change control key to command key",
    "rules": [
         {
            "description": "Change left_control + ACFVXZ to left_command + ACFVXZ",
            "manipulators": [
                {
                    "from": {
                        "key_code": "return_or_enter",
                        "modifiers": {
                            "mandatory": ["left_control"],
                            "optional": ["any"]
                        }
                    },
                    "to": [
                        {
                          "key_code": "return_or_enter",
                          "modifiers": [
                            "left_command"
                          ]
                        }
                    ],
                    "type": "basic",
                    "conditions": [
                        {
                          "type": "frontmost_application_unless",
                          "bundle_identifiers": [
                            "Terminal",
                            "^com\\.2X\\.Client\\.Mac$"
                          ]
                        }
                    ]
                },
                {
                    "from": {
                        "key_code": "c",
                        "modifiers": {
                            "mandatory": ["left_control"],
                            "optional": ["any"]
                        }
                    },
                    "to": [
                        {
                          "key_code": "c",
                          "modifiers": [
                            "left_command"
                          ]
                        }
                    ],
                    "type": "basic",
                    "conditions": [
                        {
                          "type": "frontmost_application_unless",
                          "bundle_identifiers": [
                            "Terminal",
                            "^com\\.2X\\.Client\\.Mac$"
                          ]
                        }
                    ]
                },
                {
                    "from": {
                        "key_code": "f",
                        "modifiers": {
                            "mandatory": ["left_control"],
                            "optional": ["any"]
                        }
                    },
                    "to": [
                        {
                          "key_code": "f",
                          "modifiers": [
                            "left_command"
                          ]
                        }
                    ],
                    "type": "basic",
                    "conditions": [
                        {
                          "type": "frontmost_application_unless",
                          "bundle_identifiers": [
                            "Terminal",
                            "^com\\.2X\\.Client\\.Mac$"
                          ]
                        }
                    ]
                },
                {
                    "from": {
                        "key_code": "v",
                        "modifiers": {
                            "mandatory": ["left_control"],
                            "optional": ["any"]
                        }
                    },
                    "to": [
                        {
                          "key_code": "v",
                          "modifiers": [
                            "left_command"
                          ]
                        }
                    ],
                    "type": "basic",
                    "conditions": [
                        {
                          "type": "frontmost_application_unless",
                          "bundle_identifiers": [
                            "Terminal",
                            "^com\\.2X\\.Client\\.Mac$"
                          ]
                        }
                    ]
                },
                {
                    "from": {
                        "key_code": "x",
                        "modifiers": {
                            "mandatory": ["left_control"],
                            "optional": ["any"]
                        }
                    },
                    "to": [
                        {
                          "key_code": "x",
                          "modifiers": [
                            "left_command"
                          ]
                        }
                    ],
                    "type": "basic",
                    "conditions": [
                        {
                          "type": "frontmost_application_unless",
                          "bundle_identifiers": [
                            "Terminal",
                            "^com\\.2X\\.Client\\.Mac$"
                          ]
                        }
                    ]
                },
                {
                    "from": {
                        "key_code": "z",
                        "modifiers": {
                            "mandatory": ["left_control"],
                            "optional": ["any"]
                        }
                    },
                    "to": [
                        {
                          "key_code": "z",
                          "modifiers": [
                            "left_command"
                          ]
                        }
                    ],
                    "type": "basic",
                    "conditions": [
                        {
                          "type": "frontmost_application_unless",
                          "bundle_identifiers": [
                            "Terminal",
                            "^com\\.2X\\.Client\\.Mac$"
                          ]
                        }
                    ]
                }
            ]
        }

    ]
}
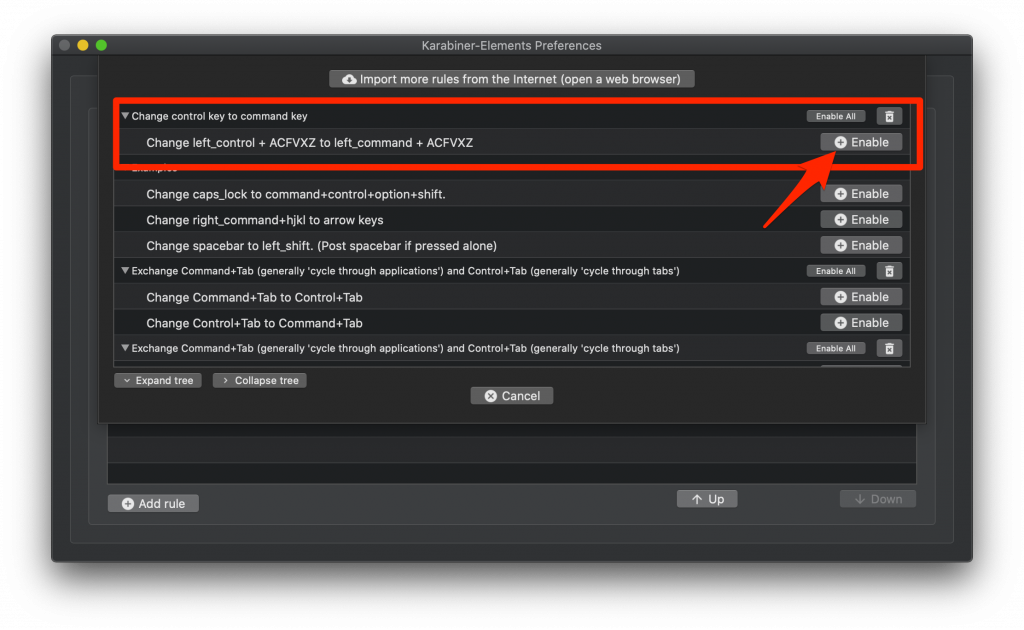
上記ファイルを$HOME/.config/karabiner/assets/complex_modifications配下に適当な名前.jsonファイルにして格納し、Karabiner-Elements側からEnableしましょう。
上記ファイルで実施しているのは下記の動作です。
ポイント
- コピー(Cmd-C)、切り取り(Cmd-X)、ペースト(Cmd-V)、検索(Cmd-F)、Undo(Cmd-Z)をWindowsでお馴染みのCtrl-○に割当
- Cmd-Enter(メール送信)もCtrl-Enterに割当
- ただし、TerminalとParallels Client(アプリ識別子は"com.2X.Client.Mac")は除く
Windowsキー、Altキー
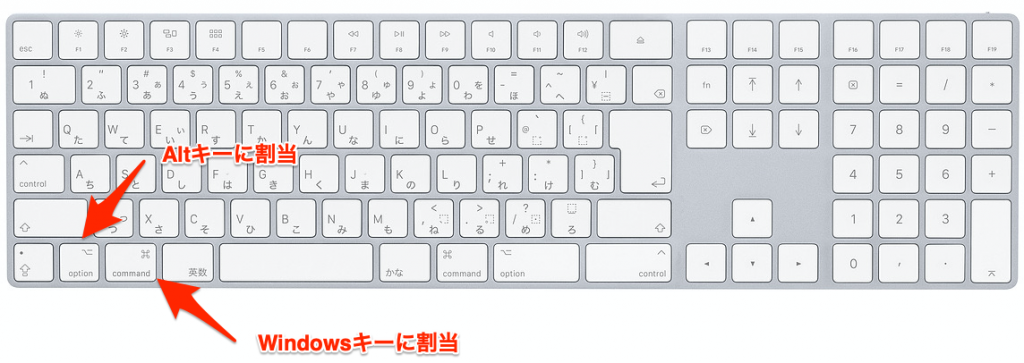
次にMacのCommand⌘キーとオプション⌥キーですが、Parallels Clientでは以下のように変換されます。
| Mac側キー | Windows側でのキーアサイン |
| Command ⌘ キー | Windowsキー |
| Option ⌥ キー | Altキー |
キーボードを見てもらえると分かる通り、Windows使いにとっては逆の方が使いやすい。つまり、Option ⌥ キーをWindowsキーに、Command ⌘ キーをAltにしたほうが馴染みがあります。
ので以下の通りParallels ClientのみOptionとCommandキーを入れ替えましょう。
{
  "title": "OPT <=> CMD in Parallels",
  "rules": [
    {
      "description": "Left Swap option and command in Parallels",
      "manipulators": [
        {
          "type": "basic",
          "from": {
            "key_code": "left_option",
            "modifiers": {
              "optional": [
                "any"
              ]
            }
          },
          "to": [
            {
              "key_code": "left_command"
            }
          ],
          "conditions": [
            {
              "type": "frontmost_application_if",
              "bundle_identifiers": [
                "^com\\.2X\\.Client\\.Mac$"
              ]
            }
          ]
        },
        {
          "type": "basic",
          "from": {
            "key_code": "left_command",
            "modifiers": {
              "optional": [
                "any"
              ]
            }
          },
          "to": [
            {
              "key_code": "left_option"
            }
          ],
          "conditions": [
            {
              "type": "frontmost_application_if",
              "bundle_identifiers": [
                "^com\\.2X\\.Client\\.Mac$"
              ]
            }
          ]
        }
      ]
    },
    {
      "description": "Right Swap option and command in Parallels",
      "manipulators": [
        {
          "type": "basic",
          "from": {
            "key_code": "right_option",
            "modifiers": {
              "optional": [
                "any"
              ]
            }
          },
          "to": [
            {
              "key_code": "right_command"
            }
          ],
          "conditions": [
            {
              "type": "frontmost_application_if",
              "bundle_identifiers": [
                "^com\\.2X\\.Client\\.Mac$"
              ]
            }
          ]
        },
        {
          "type": "basic",
          "from": {
            "key_code": "right_command",
            "modifiers": {
              "optional": [
                "any"
              ]
            }
          },
          "to": [
            {
              "key_code": "right_option"
            }
          ],
          "conditions": [
            {
              "type": "frontmost_application_if",
              "bundle_identifiers": [
                "^com\\.2X\\.Client\\.Mac$"
              ]
            }
          ]
        }
      ]
    }
  ]
}
アプリケーションキーを設定してみよう
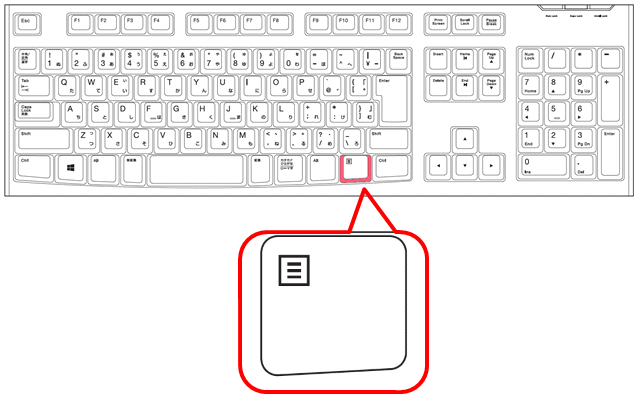
アプリケーションキー、というと馴染みのない方もいらっしゃるかと思いますが、

このキーです。右クリックと同じ働きをします。このキーでなくてもShift+F10でも同様の働きをします。
【えれさぽパソコン講座】キーボードの各キーについて
詳しくは上記Elecom社の解説もご参照ください。
右Optionキーをアプリケーションキーとして設定してみましょう。
    {
      "description": "Right Swap option and command, and set application key in Parallels",
      "manipulators": [
        {
          "type": "basic",
          "from": {
            "key_code": "right_option",
            "modifiers": {
              "optional": [
                "any"
              ]
            }
          },
          "to": [
            {
              "key_code": "f10",
              "modifiers": "shift"
            }
          ],
          "conditions": [
            {
              "type": "frontmost_application_if",
              "bundle_identifiers": [
                "^com\\.2X\\.Client\\.Mac$",
                "^com\\.splashtop\\.stp\\.macosx$",
                "^com\\.microsoft\\.rdc\\.macos$"
              ]
            }
          ]
        },
        {
          "type": "basic",
          "from": {
            "key_code": "right_command",
            "modifiers": {
              "optional": [
                "any"
              ]
            }
          },
          "to": [
            {
              "key_code": "right_option"
            }
          ],
          "conditions": [
            {
              "type": "frontmost_application_if",
              "bundle_identifiers": [
                "^com\\.2X\\.Client\\.Mac$",
                "^com\\.splashtop\\.stp\\.macosx$",
                "^com\\.microsoft\\.rdc\\.macos$"
              ]
            }
          ]
        }
      ]
    }
先程の設定ファイルの57−109行目を上記のように変更しましょう。ポイントは70−75行目です。右Option⌥キーにShift+F10を割り当てています。
記事は以上!


